

You can spark your child's curiosity with 15 exciting STEM projects using household items you already own. Try creating a baking soda volcano, layering a rainbow density jar, building a balloon-powered car, or experimenting with homemade slime. Test paper airplane aerodynamics, challenge engineers with egg drop structures, or explore surface tension with floating paper clips. These budget-friendly activities teach real scientific principles like chemical reactions, density, motion, and problem-solving—no expensive kits required. Discover how to adapt each project for different ages and keep your young scientist engaged with hands-on learning.
Key Takeaways
- Baking soda and vinegar volcano demonstrates chemical reactions using common household ingredients and optional food coloring for visual effect.
- Balloon-powered car teaches Newton's third law of motion using a balloon, plastic base, and bottle cap wheels.
- Rainbow density jar explores density principles by layering sugar water solutions with food coloring in a clear container.
- Egg drop engineering test challenges kids to build protective structures using cardboard, straws, and bubble wrap materials.
- Paper bridge experiment teaches structural engineering by testing weight capacity using folded paper, tape, and household weights.


National Geographic Mega Science Kit
Best Engineering & Building STEM Toys
These hands-on building sets teach engineering principles while kids have fun constructing.


Best Science Exploration Tools
Give kids the tools real scientists use to explore the natural world around them.

Kids Beginner Microscope Kit
- Multiple magnification levels (40X-1000X)
- LED lighting for clear specimen viewing
- Includes prepared slides and blank slides
- Durable construction for young scientists
Best Coding & Robotics for Kids
Introduce programming concepts early with these screen-free and interactive coding toys.


Crystal Growing Science Kit
- Teaches chemistry through crystal formation
- Multiple colors to grow and display
- Requires patience – great for delayed gratification
- Affordable introduction to earth science
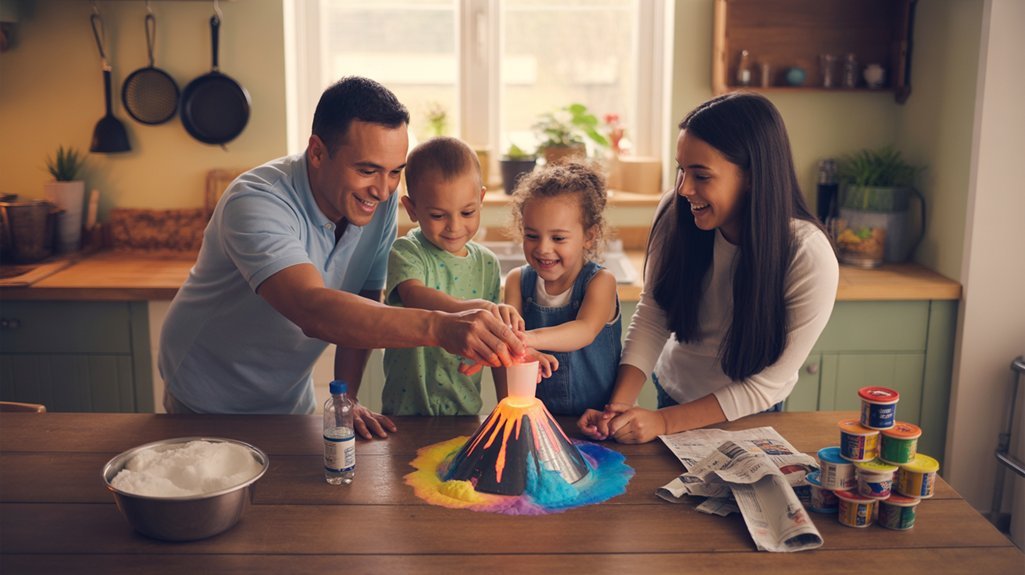
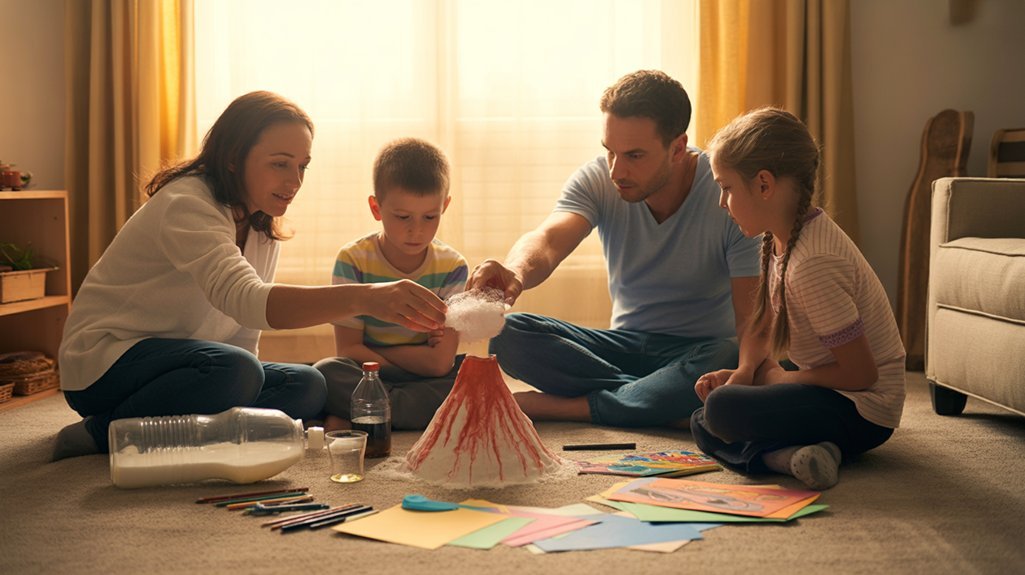
Baking Soda and Vinegar Volcano

The baking soda and vinegar volcano stands as one of the most popular and exciting science experiments you can do at home. This classic demonstration helps children understand chemical reactions through hands-on learning, making it perfect for STEM projects that engage young minds.
You'll need just a few tablespoons of baking soda in a container and vinegar to pour over it. When the vinegar's acid meets the sodium bicarbonate, it creates carbon dioxide gas that bubbles up like a volcanic eruption. Add food coloring to make the reaction more visually striking for your students or children.
The fizzing occurs because the acid breaks down the bicarbonate, releasing gas bubbles that simulate an erupting volcano. This teaches kids about reactants, products, and gas formation in an unforgettable way.
Remember to conduct this baking soda and vinegar experiment in a suitable area since it creates a mess. Consider protective eyewear for larger demonstrations. These hands-on science experiences support early learning development by helping children observe, predict, and understand the world around them through direct exploration.
Rainbow Density Jar
Creating a Rainbow Density Jar lets kids explore scientific principles while making something beautiful they'll want to show everyone. This STEM project converts everyday materials into a stunning display of colorful layers that demonstrate how density works.
You'll create different density levels by dissolving varying amounts of sugar in water. More sugar makes denser solutions that sink to the bottom, while lighter solutions float on top. Add food coloring to each mixture, then carefully pour them into a clear jar.
| Layer | Sugar Amount |
|---|---|
| Bottom (densest) | 4 tablespoons |
| Second | 3 tablespoons |
| Third | 2 tablespoons |
| Top (least dense) | 1 tablespoon |
Pour slowly along the jar's side to prevent mixing. When done correctly, your science experiments will showcase distinct, vibrant layers that won't blend together. This visual demonstration encourages children to ask questions about why liquids behave differently, helping them develop critical thinking skills while serving as excited teachers to friends and family. Projects like this support children's learning and emotional development by making complex scientific concepts accessible and engaging through hands-on exploration.
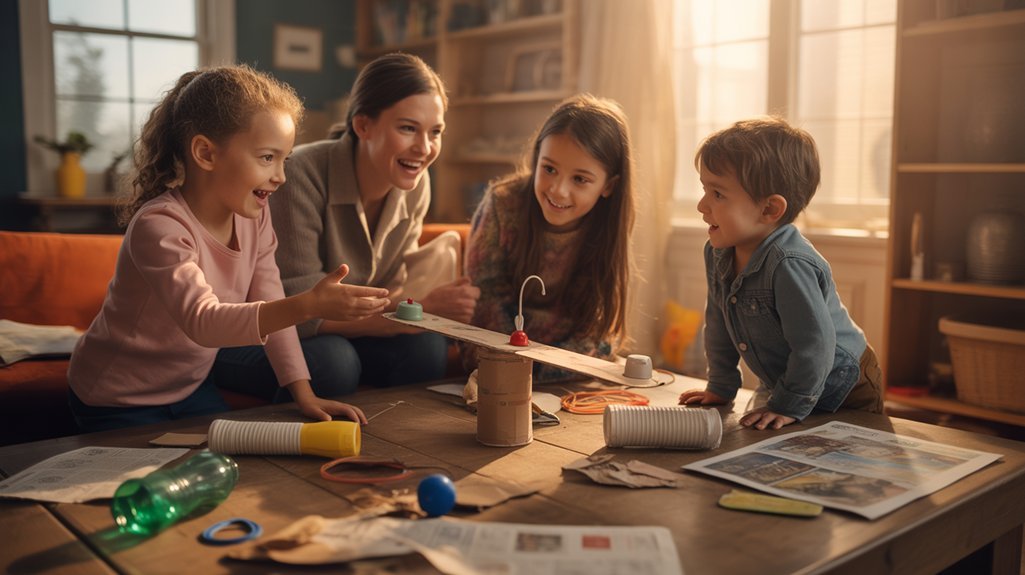
Balloon-Powered Car
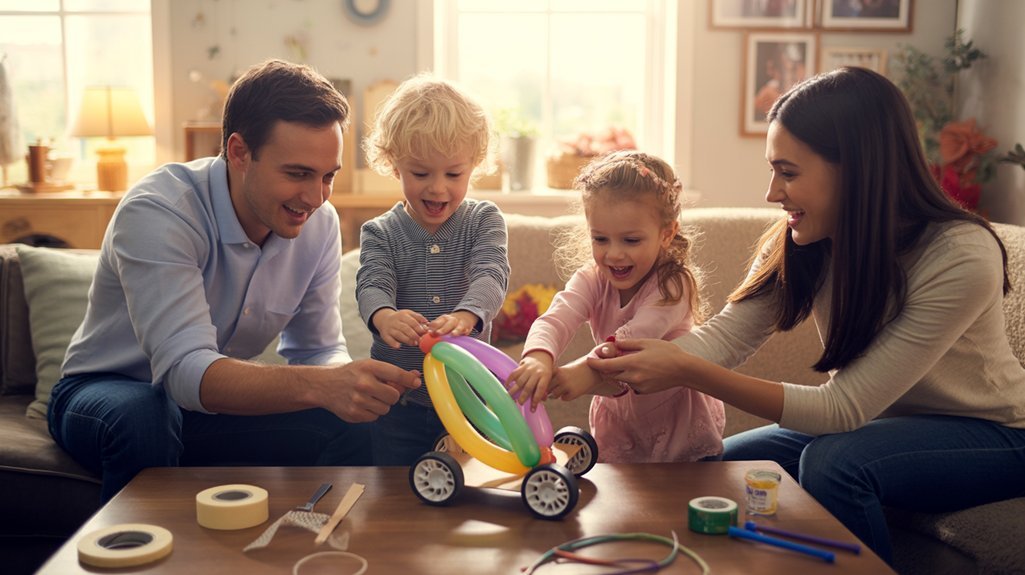
You'll love building a balloon-powered car because it's easy to make with simple materials you already have at home.
By following straightforward assembly steps, you'll create a working vehicle that demonstrates real physics principles in action.
Once you understand how air pressure and motion work together, you can experiment with different designs to make your car go faster and farther.
Materials Needed at Home
Building your balloon-powered car starts with gathering simple materials you probably already have around your home. For this engaging STEM Activities Using basic supplies, you'll need just a balloon, a lightweight plastic or cardboard base, and wheels made from bottle caps or similar round objects.
These common household items convert into an educational tool that'll help children discover Newton's third law of motion. You'll also want tape or glue to secure components together.
The beauty of this project lies in its accessibility—no special purchases required. This experiment teaches kids about kinetic energy and aerodynamics while demonstrating how everyday materials can become learning opportunities. Like other activities for children, this hands-on project encourages creativity and problem-solving skills while making science concepts tangible and fun.
Step-by-Step Assembly Instructions
This hands-on project comes together in five simple steps that'll have your car rolling in about 15 minutes.
First, attach four bottle caps to your plastic bottle's sides using glue or tape—these become your wheels.
Second, insert the straw into your balloon's neck and secure it tightly so air can't escape.
Third, poke a hole in the bottle's top and thread the straw through, leaving part extending outside.
Fourth, inflate the balloon through the straw.
Finally, set your creation on a flat surface and release the balloon's opening to watch it zoom forward!
This fun STEM activity demonstrates real engineering challenges through hands-on experimentation.
You're teaching kids valuable STEM learning principles while creating something they'll love sharing with friends and family.
For more project ideas that engage kids in thinking, coding, building, explore additional hands-on activities that reinforce scientific concepts through play.
Physics Concepts Explained
When your balloon-powered car zooms across the floor, it's demonstrating one of physics' most fundamental principles: Newton's Third Law of Motion. As air rushes out of the balloon (the action), it pushes the car forward (the equal and opposite reaction).
You'll help children grasp these physics concepts by encouraging them to experiment with different variables—try larger balloons, adjust the car's weight, or change its angle.
Have them measure and record how far the car travels each time. This data collection builds critical thinking as they analyze patterns between air volume and distance traveled.
When kids modify their designs to improve performance, they're developing engineering skills that'll serve them throughout their education. These hands-on observations convert abstract scientific principles into tangible, memorable learning experiences.
Homemade Slime or Oobleck
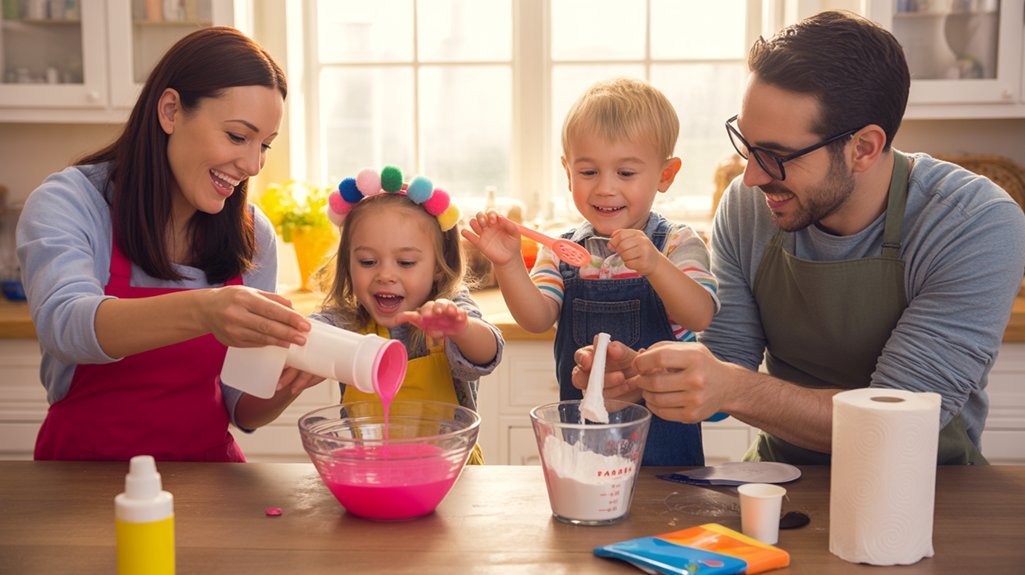
Everyone loves getting messy with slime and oobleck, and you'll love them even more when you discover the amazing science behind these gooey creations!
You can make homemade slime using glue, water, and borax or cornstarch. Mix these simple ingredients together, then customize your creation with colors and glitter. Remember, borax can irritate skin, so ask an adult to supervise.
For oobleck, you'll only need cornstarch and water. This non-Newtonian fluid acts like magic—it becomes solid when you squeeze it but flows like liquid when you relax your grip. Try punching it gently, then letting it drip through your fingers.
Both activities teach you about polymers and viscosity through hands-on experimentation. As you squish, stretch, and explore these materials, you're developing fine motor skills while experiencing STEM learning firsthand.
Share these experiments with younger kids to help them discover science through sensory play. You'll be amazed at what simple kitchen ingredients can teach!
Paper Airplane Aerodynamics Challenge
You'll convert a simple sheet of paper into a flying laboratory by building different airplane designs and watching how each one soars.
Grab a ruler or tape measure to track exactly how far each plane travels, then record your results to spot patterns.
As you experiment, you'll discover how wing shapes create lift to keep planes airborne and how air resistance (drag) can slow them down or make them wobble mid-flight.
Testing Different Plane Designs
Paper airplanes change into flying laboratories when you test different designs to discover what makes them soar farther and fly straighter. Kids learn valuable engineering skills by creating variations like dart planes, gliders, and wide-winged designs.
Have them modify one element at a time—wing size, nose weight, or tail shape—so they can identify what truly affects performance.
Set up a testing station where students launch each plane three times, measuring and recording distances. They'll notice patterns: narrow wings often fly faster, while broader wings provide stability.
Encourage them to sketch their designs and note observations. These engineering activities teach children that failure isn't final—it's feedback for improvement.
Measuring Flight Distance Accurately
Accurate measurements convert casual paper tosses into real scientific experiments.
You'll need a measuring tape and a designated launch area with a clear starting line. Mark this spot so every flight begins from the same position—consistency matters when comparing airplane designs.
Measure the flight distance from your launch line to where the nose touches down. Record each result carefully.
Don't stop at one flight! Conduct at least three trials per design, then calculate the average distance for reliable data.
Encourage your young scientists to experiment with different wing shapes and body lengths. How does each change affect performance?
Test variables like weight distribution and launch angle. Through this systematic approach, you're helping kids discover how real engineers solve problems and improve designs.
Understanding Lift and Drag
When your paper airplane soars through the air, two invisible forces battle for control of its flight. Lift pushes your plane upward, created when air moves faster over the curved top of the wings than underneath, producing lower pressure above.
Drag pulls back against your airplane's forward motion, caused by air friction against its surfaces.
You'll notice how wing shape dramatically affects performance. Wider wings generate more lift but also create more drag. Experiment by folding different designs—try narrow wings for speed or broader wings for longer gliding.
Adjust the angle by bending the back edges slightly upward to increase lift.
Test your modifications and share what you discover with friends. By understanding these forces, you're helping others learn fundamental principles that real engineers use when designing aircraft.
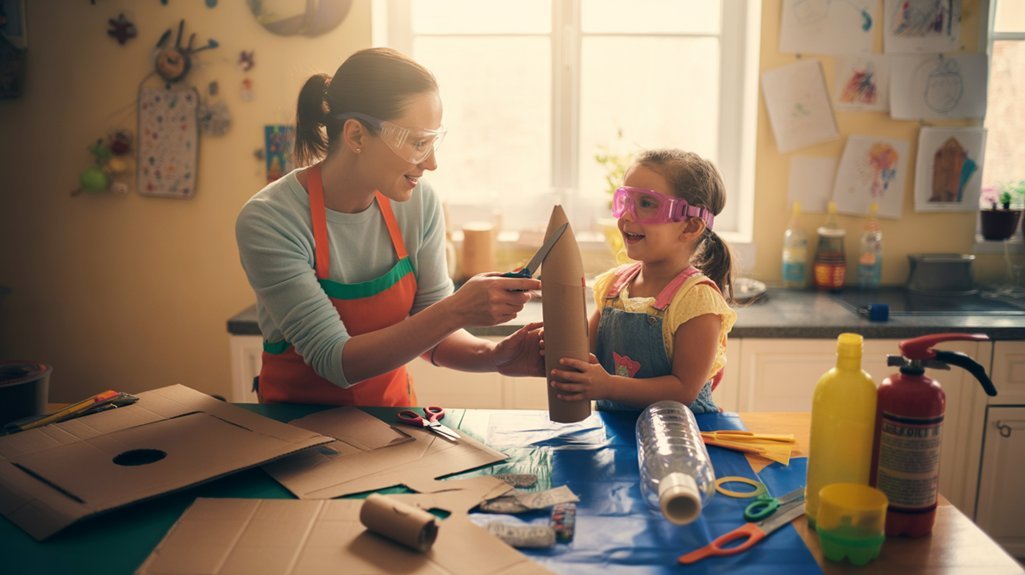
Egg Drop Engineering Test
As you prepare for the Egg Drop Engineering Test, gather simple household materials like cardboard boxes, drinking straws, bubble wrap, tape, and plastic bags. This exciting egg drop challenge lets you explore engineering principles while protecting a fragile egg from impact forces.
The egg drop challenge transforms ordinary household items into engineering solutions that protect fragile cargo from powerful impact forces.
Start by discussing design ideas with your team. Consider how different materials absorb shock and cushion the egg. Build your protective structure, testing how gravity and impact forces affect your design.
Don't worry if your first attempt doesn't succeed—that's part of the learning process!
After each drop, reflect on what worked and what needs improvement. Did the bubble wrap provide enough cushioning? Should you add more layers? These questions help you think like an engineer.
This hands-on project teaches you resilience and problem-solving skills you'll use throughout life. By sharing your discoveries with teammates, you'll develop collaboration abilities that help others learn and grow too.
DIY Lava Lamp

Building protective structures tests your engineering skills, but chemistry experiments can be just as thrilling! Your DIY lava lamp demonstrates intriguing scientific principles while creating a mesmerizing display you can share with others.
Start by filling a clear bottle one-third full with water and add food coloring. Pour vegetable oil to nearly fill the container, leaving space at the top. You'll notice the oil floats because it's less dense than water.
Now for the magic: drop in an Alka-Seltzer tablet or baking soda. This creates chemical reactions that produce carbon dioxide gas bubbles. Watch as these bubbles rise through the oil, carrying colorful water droplets upward before releasing them to fall back down.
This captivating effect demonstrates density differences and how gases behave in liquids. You can repeat the process multiple times, making it perfect for teaching younger siblings or friends about science through hands-on exploration.
Skittles Diffusion Experiment
Your next colorful experiment converts simple candy into a stunning science lesson about diffusion! This activity helps kids understand how molecules move and interact while creating beautiful patterns they'll love to observe.
Arrange Skittles in a circle on a white plate, spacing them evenly around the edge. Pour warm water into the center and watch the magic unfold. The colored sugar coatings dissolve, creating vibrant streams that flow toward the middle. You'll notice each color maintains its distinct path, demonstrating concentration gradients in action.
This hands-on approach makes abstract scientific concepts tangible for young learners. Kids grasp diffusion principles by watching molecules spread from areas of high concentration to low concentration. The visual results keep them engaged throughout the experiments using everyday materials.
Download the free worksheet to help children record their observations and develop critical thinking skills. Once you've documented the patterns, reward their scientific efforts by letting them enjoy the leftover Skittles!
Leakproof Bag With Pencils
Grab a zip-top bag, some sharp pencils, and prepare to amaze your young scientists with this mind-bending experiment! Fill the leakproof bag three-quarters full with water and seal it tightly.
Now here's where the magic happens: carefully push sharpened pencils straight through one side of the bag and out the other. Your students will expect water to pour out, but it won't!
This surprising demonstration teaches scientific principles about polymers—the long-chain molecules that make up plastic bags. When pencils pierce the material, these flexible polymer chains actually seal around the intrusion, preventing leaks.
You're showing children how materials respond to pressure and structural changes in real-time. This hands-on activity requires virtually no preparation and delivers unforgettable results.
Your young learners will be captivated as they watch water defy expectations, making complex chemistry concepts accessible and exciting. It's an ideal experiment for nurturing curiosity and building confidence in budding scientists.
Paper Bridge Load-Bearing Test
You'll need just a few simple supplies to build your paper bridge: sheets of paper, tape, scissors, and small weights like coins or washers.
Follow the building steps carefully to create your design, whether you choose a flat beam, folded structure, or arch shape.
Once your bridge is ready, you'll test it by adding weights one at a time and recording how much it can hold before it collapses.
Materials Needed for Bridge
Building a strong paper bridge starts with gathering the right supplies.
You'll need sturdy paper like cardstock or construction paper—these materials give students the structural support they need to build an effective design. Regular printer paper works too, though it won't hold as much weight.
Grab scissors for cutting precise shapes and pieces, along with tape to secure connections between parts.
For testing your bridge's strength, collect small weights such as coins, washers, or lightweight toys. These let students use a gradual approach to see exactly how much their design can support.
Having everything ready before you begin helps the activity run smoothly and keeps young engineers focused on designing, testing, and improving their bridges to serve others through creative problem-solving.
Step-by-Step Building Instructions
With your materials in hand, it's time to create your bridge and put it to the test. Start by folding your paper into strong structures—try accordion folds, tubes, or triangular shapes. These designs help your bridge support more weight.
Position your paper bridge between two books or chairs, making sure there's a gap underneath. Use tape to secure the ends firmly to each surface.
Now comes the exciting part! Carefully place one coin or marble at the center of your bridge. Keep adding weights one at a time, counting as you go. Watch closely to see how your paper responds.
When your bridge finally collapses, record the total weight it held. You've just completed an engineering experiment that'll help others learn about building better structures!
Testing and Recording Results
Once your bridge collapses, it's time to become a scientific investigator! Recording results helps you understand which different structures perform best under pressure.
Create a simple data table to track your findings:
| Bridge Design | Weight Supported |
|---|---|
| Arch Bridge | ___ pennies |
| Beam Bridge | ___ pennies |
| Truss Bridge | ___ pennies |
| Your Custom Design | ___ pennies |
During testing, add pennies or small weights one at a time, counting carefully until collapse. Write down exactly what happened—did the sides buckle? Did the deck sag? These observations matter! Compare your results with classmates to discover which designs held the most weight. You'll notice patterns that reveal engineering principles like tension and compression. This information helps you redesign stronger bridges and teaches others valuable lessons about structural integrity.
Static Electricity Butterfly
Static electricity comes alive in this delightful project where you'll create a butterfly that dances without anyone touching it. Using everyday materials like tissue paper and a balloon, you'll demonstrate fascinating electric forces that'll captivate young learners.
Cut a butterfly shape from tissue paper and place it on a flat surface. Rub your balloon vigorously against your hair or a wool sweater to build up static electricity. Slowly bring the charged balloon near your paper butterfly and watch it flutter and move as if by magic!
This simple experiment perfectly illustrates how static charges interact with lightweight objects. As you guide children through this activity, you're helping them understand attraction and repulsion between electric charges. They'll see science in action and develop curiosity about the invisible forces around them.
Use this hands-on project to spark meaningful conversations about electricity and encourage young minds to explore the scientific principles that make our world work.
Floating Paper Clip Challenge
While invisible electric forces create movement through air, you can also explore surprising science with something as ordinary as a glass of water. The floating paper clip challenge demonstrates surface tension—nature's invisible skin on water that supports objects denser than the liquid itself.
Fill a glass to the brim with water. Place a paper clip flat on a small piece of tissue, then gently lower both onto the water's surface. The tissue will sink, but your paper clip will float! Use this as a teaching moment to encourage critical thinking by asking why it stays afloat.
Enhance the experiment by testing different paper clip sizes or adding a drop of dish soap to break the surface tension. You'll watch the clip immediately sink, proving how molecular forces work together.
This hands-on demonstration helps young learners grasp density, buoyancy, and intermolecular forces through simple observation and experimentation.
Hot and Cold Water Density Discovery
Temperature creates dramatic differences in water that you can actually see with your own eyes. This simple experiment helps young scientists understand density through visual observation.
You'll need two clear containers, hot water, cold water, and food coloring. Fill one container with hot water and another with cold water. Add a few drops of food coloring to each container and watch what happens. The color disperses much faster in hot water because it's less dense and has more molecular movement.
Now for the exciting part: carefully pour cold water into a container, then slowly add hot water on top. The hot water will float above the cold water, creating distinct layers that demonstrate density differences beautifully.
Encourage children to make predictions before starting. What'll happen when temperatures mix? This hands-on activity makes abstract concepts tangible, helping kids grasp thermal expansion and liquid behavior while developing their scientific thinking skills.
Homemade Bubble Solution and Wand Design
Because bubbles captivate children of all ages, making your own bubble solution changes a simple outdoor activity into an engaging science experiment.
Transform ordinary playtime into scientific discovery by crafting homemade bubble solutions that spark curiosity and wonder in young minds.
You'll need 1 cup of dish soap, 6 cups of water, and 1 tablespoon of glycerin or corn syrup. The glycerin strengthens bubbles and helps them last longer, demonstrating scientific principles in action.
Next, create bubble wands using everyday materials you already have. Bend pipe cleaners into circles, squares, or stars. Connect straws with tape to form geometric shapes. Even twisted wire works beautifully for custom designs.
Encourage children to experiment by testing different soap brands to discover which produces the largest, most durable bubbles. They can compare how plastic versus metal wands affect bubble formation.
For added excitement, mix in food coloring to create colorful bubbles that change your backyard into an artistic laboratory. This hands-on project teaches chemistry concepts while promoting creativity and scientific curiosity.
Apple Slice Oxidation Observation
You'll discover how apples turn brown when you cut them open and expose them to air—that's oxidation in action!
Set up your experiment by cutting an apple into equal slices and placing each one in a different liquid like lemon juice, water, or vinegar.
Before you start, make a prediction about which liquid you think will best prevent browning, then watch what happens over the next hour.
Understanding the Oxidation Process
When you slice into a fresh apple and leave it on the counter, you'll notice something interesting happens within minutes—the bright white flesh starts turning brown. This oxidation occurs when enzymes in apple slices react with oxygen, creating brown melanin pigments. You can help others understand food science by demonstrating this process! Try this experiment: place apple slices in different solutions and observe the browning rates.
| Solution | Purpose | Expected Result |
|---|---|---|
| Plain water | Control group | Moderate browning |
| Lemon juice | Acidic barrier | Minimal browning |
| Vinegar | Acidic barrier | Minimal browning |
| Salt water | Enzyme inhibitor | Reduced browning |
| No treatment | Natural oxidation | Fastest browning |
This hands-on activity teaches valuable lessons about food preservation and antioxidants.
Setting Up Your Experiment
This apple oxidation experiment requires just a few simple supplies you probably already have at home.
Setting up your experiment starts with gathering freshly cut apple slices, various household liquids like lemon juice, vinegar, and water, plus observation sheets to record your findings. You'll also need a stopwatch to track browning times accurately.
Before diving in, take a moment to make predictions about which liquids will prevent browning most effectively. This helps develop critical thinking about acidity's role in stopping oxidation.
Once you're ready, dip each apple slice into a different liquid, then arrange them on a clean surface where you can easily observe changes. Record the time and appearance as each slice begins browning, creating valuable data for comparison and analysis.
Budget-Friendly Learning at Home
Budget-friendly STEM projects change your kitchen into a science laboratory without emptying your wallet.
Transform everyday kitchen items into powerful learning tools that spark curiosity without breaking the bank.
You'll find everything needed for engaging experiments right in your cabinets. Household items like baking soda, vinegar, and food coloring become tools for teaching chemical reactions and scientific principles to enthusiastic young minds.
These budget-friendly activities work beautifully for various age groups:
- Homemade volcano: Mix baking soda and vinegar to demonstrate chemical reactions while kids watch the exciting eruption.
- DIY slime: Combine glue and household ingredients to explore properties of matter through hands-on experimentation.
- Marble run: Convert recycled containers into engineering challenges that build problem-solving skills.
- Paper bridge construction: Use newspaper and tape to teach structural engineering concepts through trial and error.
Focus on the learning process rather than perfect results.
You're helping children develop critical thinking and creativity while showing them that science doesn't require expensive kits.
STEM activities become accessible when you embrace what's already available in your home.
Safety and Age Adaptations
You'll want to match STEM projects to your child's developmental stage while keeping safety at the forefront of every activity.
Before starting any experiment, gather the right protective equipment and assess potential hazards from chemicals, sharp tools, or small parts.
Age-Appropriate Project Selection
When choosing STEM projects for your child, matching activities to their developmental stage creates both safer and more rewarding learning experiences. You'll want to select age-appropriate materials that support their growing abilities while keeping safety at the forefront.
| Age Group | Project Examples | Skills Developed |
|---|---|---|
| Ages 4-6 | Slime making, balloon cars | Following steps, observation |
| Ages 7-10 | Bridge building, simple circuits | Problem-solving, measurement |
| Ages 11+ | Modified experiments, design challenges | Critical thinking, independence |
Elementary students thrive with hands-on activities using household items, while older kids benefit from projects that encourage them to design their own experiments. Always supervise younger children with small parts or sharp objects, and adapt tools accordingly—safety scissors for little ones, regular scissors for older kids. This thoughtful approach guarantees every child experiences successful, engaging STEM exploration.
Essential Safety Equipment
Safety equipment protects your child during STEM experiments and helps them develop good scientific habits from the start.
You'll need basic items like safety goggles for older children working with liquids or reactions that might splash. Keep aprons or old clothing handy to protect against spills when handling common hazardous materials like baking soda and vinegar.
Always supervise children during hands-on activities, especially when projects involve scissors or chemical reactions.
Establish clear protocols: wash hands after handling materials, keep potentially dangerous substances away from younger siblings, and store all safety equipment in an accessible location.
Teaching your children to use proper safety equipment instills responsibility and respect for scientific processes.
This preparation enables them to explore confidently while staying protected, setting the foundation for future learning.
Adult Supervision Guidelines
While children thrive on independence during STEM exploration, your active presence remains essential to their safety and success. You'll need to supervise young children closely, especially when projects involve sharp tools or reactive materials like vinegar and baking soda. Establish clear safety protocols before starting any experiment.
| Age Group | Your Supervision Level | Project Adaptations |
|---|---|---|
| Ages 3-5 | Constant, hands-on | Simple observations only |
| Ages 6-9 | Active, nearby | Guide tool use, simplify steps |
| Ages 10+ | Periodic check-ins | Encourage independence with protocols |
Adapt each project to be age-appropriate by selecting suitable materials—avoiding choking hazards for younger children. Encourage questions and curiosity while maintaining safety guidelines. Remember, you're creating a secure learning environment where children can explore confidently under your watchful guidance.
Chemical and Material Hazards
Before you gather materials for your next STEM adventure, you'll want to understand which substances pose risks and how to handle them safely. Stick with common household items like baking soda, vinegar, and food coloring rather than harsh chemicals.
When planning experiments involving chemical reactions, always label everything clearly so children understand what they're using.
Make safety gear non-negotiable—goggles and gloves protect young scientists from splashes and irritation. Teach kids why we wear protective equipment, not just that we must.
Show them proper disposal methods for experiment materials to protect both their families and the environment.
Select age-appropriate substances that match each child's developmental stage. You're enabling the next generation of problem-solvers while keeping them safe and teaching responsibility.
Adapting Complexity Levels
When you match STEM projects to your child's abilities, you'll convert potential frustration into exciting discoveries. Start by evaluating their age and skill level to guarantee activities align with cognitive and physical capabilities.
For younger children, simplify projects using basic concepts—like baking soda volcanoes instead of complex reactions. Older kids can tackle engineering challenges involving circuits or structures while you guide their design process and encourage independent problem-solving.
Adapting complexity levels means staying flexible with materials and approaches. Let children modify projects based on their interests, promoting creativity while maintaining core STEM concepts.
Whether you're supervising younger ones with age-appropriate safety protocols or supporting older children through challenging builds, you're providing experiences that nurture curiosity and confidence in every learner you serve.
Troubleshooting Common STEM Challenges
Every STEM project will hit a snag at some point—and that's actually a good thing. These moments build critical thinking and resilience in young learners. When challenges arise, guide children through troubleshooting by asking open-ended questions like “What happens if you change this variable?” This enables them to discover solutions independently.
Break complex projects into smaller steps so kids can tackle one problem at a time without feeling overwhelmed.
Here's how to support their problem-solving journey:
- Identify the specific issue – Help them pinpoint exactly what isn't working
- Brainstorm alternatives together – Encourage multiple solution ideas
- Embrace resourcefulness – Challenge them to use different household items when materials fall short
- Reframe setbacks positively – Remind them that failures teach valuable lessons
Keep Experimenting and Exploring
Once your child has tackled a few STEM projects, the real magic begins—building a habit of continuous discovery. Encourage ongoing experimentation by letting them explore new variations of completed projects using different household materials. When they document their process in a journal, they'll develop critical thinking skills that serve them throughout life.
Here's how to keep the momentum going:
| Strategy | Impact |
|---|---|
| Try open-ended challenges | Develops creative problem-solving |
| Discuss what worked and why | Strengthens understanding of scientific principles |
| Embrace failures as learning moments | Builds resilience and adaptability |
| Rotate available household materials | Sparks fresh ideas and curiosity |
You're not just teaching science—you're nurturing future innovators who'll use their skills to help others. Keep asking questions together, celebrate their discoveries, and watch as experimentation becomes their natural approach to understanding the world around them.
Frequently Asked Questions
What Are Some STEM Fair Project Ideas?
You'll find excellent project themes across grade levels using everyday materials!
Try balloon-powered cars for exploring motion, baking soda volcanoes for chemistry basics, or density towers with household liquids.
The egg drop challenge works wonderfully for teaching engineering, while sugar crystallization experiments demonstrate scientific processes.
Consider your students' ages and resource availability when selecting projects—younger children enjoy colorful demonstrations, while older students excel at design challenges.
Each project encourages hands-on learning that'll inspire curiosity and problem-solving skills in those you're teaching.
What Is a Stem-Related Project?
A STEM-related project helps you explore STEM concepts through hands-on experiments that solve real problems.
You'll use creative problem-solving to design, build, and test your ideas with everyday materials found at home. These projects let you discover how science, technology, engineering, and math work together in fun, practical ways.
Whether you're constructing bridges or creating chemical reactions, you're developing valuable skills while making learning exciting and meaningful for yourself and others around you.
What Are Some Unique Science Projects?
Picture a rainbow dissolving in water—that's just the beginning!
You'll discover groundbreaking experiments like Taste the Rainbow with Skittles, erupting vinegar volcanoes, and magical carbon sugar snakes.
These hands-on activities change everyday materials into fun discoveries that'll captivate young minds.
Try creating naked eggs or crystallizing sweet treats to spark children's curiosity.
Each project offers you simple ways to inspire future scientists while making learning unforgettable and delicious!
What Is an Example of STEM Based Learning?
You can try building a balloon-powered car with your kids using everyday materials like straws, bottle caps, and cardboard.
This hands-on experiment teaches them about kinetic energy while encouraging critical thinking as they figure out why their car moves.
When children test different designs and discover creative solutions to make their car go faster or farther, they're developing problem-solving skills that'll help them tackle real-world challenges and serve their communities better.
Conclusion
You've just unsealed *endless* STEM adventures that'll convert your home into the most amazing laboratory in the universe! Don't worry if your first volcano erupts like a tiny puddle instead of Mount Vesuvius—every scientist faces failures that lead to spectacular discoveries. Keep experimenting with these projects a million times over, mix and match ideas, and watch your kids evolve into the most brilliant young innovators ever. You've absolutely got this!
Related Articles
- The Ultimate Guide to Family Meal Planning
- The Ultimate Guide to Screen Time Management
- The Ultimate Guide to Family Bonding
- Family Budget Planning Guide
- Positive Parenting Techniques
Written by Sarah Mitchell, M.S., CFLE
Founder & Lead Editor
Sarah is a Certified Family Life Educator with a Master's degree in Human Development and Family Studies from the University of Missouri. With 15+ years of experience as a parent educator and mother of three, she brings both professional expertise and real-world parenting wisdom to every article.
Credentials: M.S. in Human Development and Family Studies, Certified Family Life Educator (CFLE)